My family recently found an old “digital” camcorder, and we wanted to get the old videos (as far back as 2001!) off, to be able to view them from phones and share with other family members. Trouble is, despite the “digital” branding, the camera still uses a tape. How do I save the videos?
I ended up trying a bunch of different methods and settled for something simple.
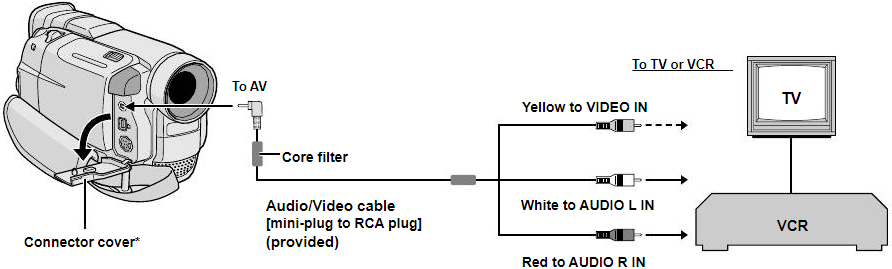
The JVC GR-DVL105 uses Mini-DV format tapes. I can’t afford a full tape editing deck, and I don’t trust 3rd party digitisation services with my tapes, so I’m not sending them off by post. I also don’t want to just hold my phone camera up to the TV screen after hooking the camera up to it, as that will give some really terrible quality.
My aim was to get the best possible quality video, without breaking the bank or my sanity. I ended up with a cheap solution, though the effort it took me to get there was more than it needed to be.
Direct PC Connection
Serial RS232-C
The camcorder comes with a cable that can attach to, according to the manual, an RS232-C input port on a PC. I haven’t seen one of these serial input ports on a PC in years. I don’t think I’ve ever used one either. We had an old PC in the garage which had the right kind of port, but the PC doesn’t boot. That’s probably why it was in the garage. Furthermore, the port is soldered onto the motherboard, not a detachable card, so that’s of no use for me.
A pity, as this is the method recommended by the manual as providing the best quality of video for digital export. I moved on.
IEEE 1394
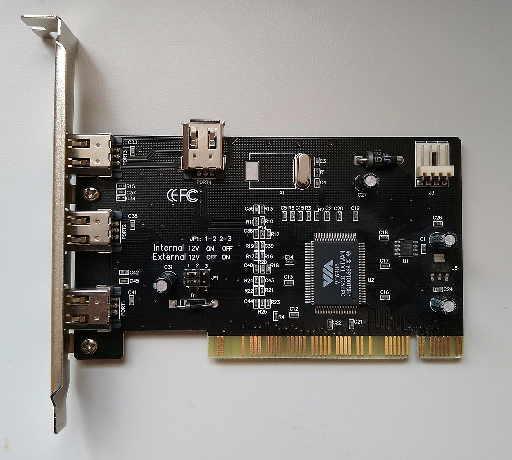
The camcorder can connect via “FireWire” or ports conforming to IEEE 1394. All I’m getting at this point is a bunch of numbers I don’t recognise. Looking it up, I found that you can buy PCI cards for IEEE 1394, so I figured I should be able to upgrade my current machine to handle it, and directly send the video from the camcorder to my PC.
After ordering and receiving the card, I immediately realised my mistake – it has the wrong PCI connection. I did not know this prior, but PCI connections have enough different standards and shapes and versions to put USB to shame. The card I bought did not fit into my PC. So, I returned it, and tried something else.
USB Composite RCA Capture
My next attempt was to try out a USB video capture system. These seem to be the go-to method for the game streaming crowd, so I figured modern systems would support it well.
One concern when looking for these devices online is some of the small print for some of these devices claim they are “video only” devices – despite having the full complement of video, left and right audio cables for input. I purchased one (more expensive) that claims to be able to do everything.
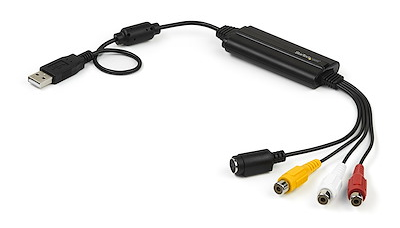
I plugged it in, and voila. Windows 10 automatically recognised what it was, and set up the audio driver input. When I open VLC or OBS, I could hear the audio playing from the camera. But no video. That was extremely unhelpful, frustrating due to how close it was to working and I needed to investigate further.
Installing the drivers for the video input is a painful process. The distributor offers a zip folder on the website, a CD-ROM with extra drivers which don’t work on Windows 10, and some official guidance which involves disabling driver signatures (!) in the Windows boot settings. The actual manufacturer of the chip also offers it’s own advice. None of this worked.
I had a look on Linux and the only advice I could find was to build and compile my own kernel modules. The repository that exists kept giving build errors when I tried to use it, and I have no desire to try and debug it. I don’t use mac at all, but just an FYI that it no longer works on 64-bit macs according to various complaints I’ve seen around the web.
This was a total waste of time, and I’m now realising that the best choice would just have been to go with an old-fashioned intermediary, as jumping directly from the camcorder to the PC is going to be impossible.
Turns out the old DVD player I never use is actually a recorder as well.
DVD
I am sceptical of DVD as a long-term storage medium. Much like tape, discs are susceptible to accidental damage, environmental factors and can decay, though DVDs are supposedly more resilient. But the long-term ability to read these is questionable, as reading devices break down or become rare. I myself no longer have a disc drive on my PC and own a USB disc reader on the rare occasion I need on. But as a temporary means of transferring data, it works well.
I should have used DVDs from the beginning. The DVD recorder has been sitting right in front of me, but never having written any DVDs before I hadn’t considered it. With a stack of 10 blank DVDs, I set about connecting the camera to the recorder and got to work.
It’s a good thing I got such a big stack of DVDs. For reasons that escape me, the recorder displayed some of the DVDs as invalid and unrecordable, despite being DVD-RWs. Luckily, some of them worked properly.
Going through the camcorder tapes needs to be done at 1:1 time for the recording to work with old analogue tech, so this gave us a good chance to sit down and watch the contents of the old films. It was full of cringy moments and nice memories.
Transfer to PC
The ultimate step, ripping the DVDs onto my PC, came next.
A long time ago I got some software to rip DVDs into digital files. Trying it now, and entering my valid license key, failed to activate the software. Because of course the server is down. DRM, bane of our collective digital existence. I reckon DRM is more of a threat to conservation than bit rot on physical mediums.
I ditched that and looked for open-source alternatives. VLC, the videophiles swiss army knife, can read DVDs, but the wiki page recommends other tools dedicated for DVD ripping.
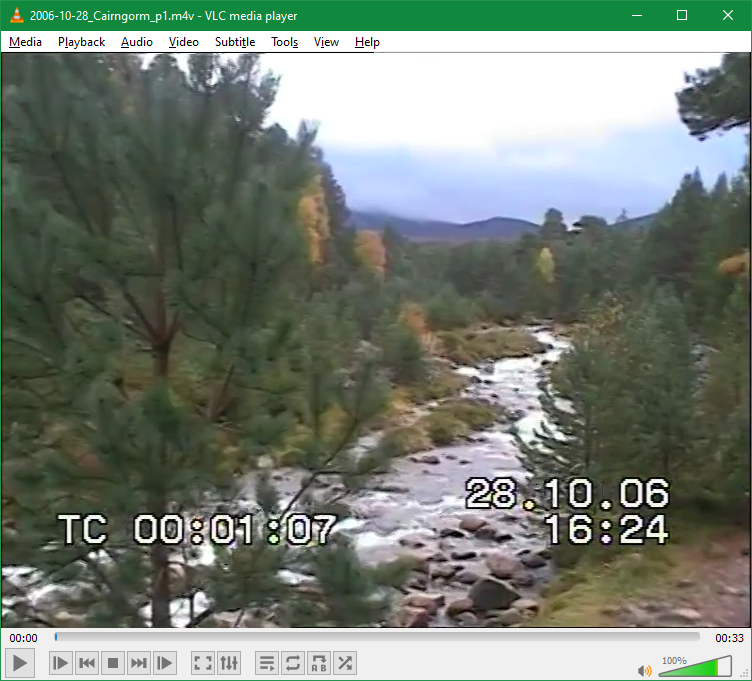
I ended up using handbrake. It has a really simple and easy to use GUI. Insert the disc, open handbrake, select the DVD. Then it scans it and builds up a list of all the tracks and titles, including chapter marks (not that ever figured out how to make those). I selected each DVD title, queued it, and ran the queue, and it worked. The default settings gave good quality digital files.
Then I used ffmpeg to trim the blue screens and overlapping tape recordings up. ffmpeg is a command line toolset which made it easy to chop the video up. Once I figured out what command to use, of course. Some manual reading later, here’s the command I used to split up and re-encode video files:
ffmpeg -i input.m4v -ss 00:00:01 -to 00:01:00 output.m4v
-ss is the start timestamp in HH:MM:SS and -to is the end timestamp. There’s probably multiple ways to do this.
Run that command and ffmpeg does all the work for you. No need to open an editing program and fiddle about with resolutions and clipping and rendering. From there, the resulting video plays well on the PC, mobile phones and can be stored in the cloud. And I always have the DVD copies if I want to play them on the TV.
I love the rare occasions where esoteric tasks involving a computer just work. I love it when some open-source enthusiast has already done the bulk of the work for me. I wish I hadn’t spent the week prior messing around trying to use various broken and incompatible technologies and just tried the simple route.
Anyway, I have now safely digitised the old memories, backed them up in multiple locations, and can share them with the family. In the end, a job well done.
Hi,
Having gone through a similar pantomime, I would like to offer the likeliest reason for the usb capture failure in my humble opinion.
The lead which goes between the camera and the phono sockets on the usb dongle is probably unsuitable. The 3.5mm jack end is available with several different wiring arrangements depending on manufacturer. In my case I had a Panasonic camera but Panasonic in their infinite wisdom changed their device to the Sony wiring arrangement. This caused me a lot of butchery and delicate soldering but the end result worked 🙂
That may well have been the problem. Alas I don’t have the patience or equipment to test each wire and repair them.
If it’s MiniDV then signal on those tapes is already digital, just use FireWire to grab it losslessly. Lots of free and open source software to help you is readily available and if you don’t have any computer with FireWire port just buy some 2004-ish laptop for $10.