
The Mod Making Process
In the process of making a new mod for vivaldi, I thought I might document some of the steps I went through, to show one way you can make a mod. I’ll follow how I made my “Site Security Info Favicon” mod.

Finding an Idea
The first step is a tricky one – I have to come up with an idea. If I’m lucky, someone else will suggest an idea that I can steal implement on their behalf.
A mod is something that mixes up Vivaldi, changes how it looks, or adds something new. It’s worth noting that not all ideas will lend themselves well to a browser mod, though:
- Some ideas might be better suited as web extensions, for example if they interact with the content of a specific website or can use data that is easily accessible through the extension API, like bookmarks
- Others might be nigh on impossible to develop and maintain, for example if the mod requires deep integration with the internals of the browser

In my example, there was a suggestion made by user @wagner, about showing the site’s favicon in the site security box, next to the URL. This lends itself well to a mod because:
- It deals specifically with a part of the browser, not a webpage or data
- Making small changes to the browser’s UI can be done in mods relatively easy, and the solution isn’t likely to require a lot of change between versions
Once I’ve settled on an idea that seems like it would make a good mod, I can move on to the next step:
Getting my tools ready
Writing a mod requires the right set of tools. If you’ve done it once, you don’t need to re-do this step, but I’ll go over the basics. The forums have a good thread describing how to begin doing this:
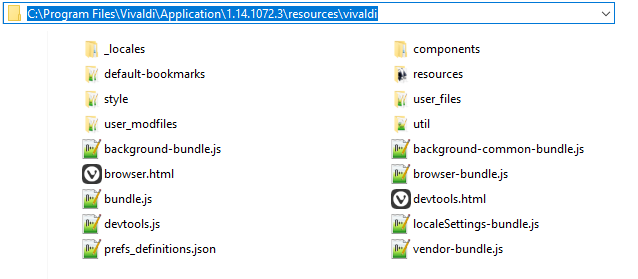
You need to locate the browser resources on your system. This forum post by @Christoph142 should give you a run-down of where to find them, and what to do with them when you get there. It’s a great starting post, whether you’re making or installing a mod.
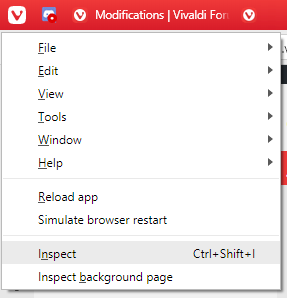
The one tool which I would argue is the most vital to the success of modding is the browser inspector. This forum post by @luetage explains how to get that setup. The inspector makes it very easy to look at what parts of the browser exist where. In my example case, we need simply right-click on a favicon and inspect it to see how the browser makes the favicon exist for a tab.
You then need to choose an editor to start writing your mod in. Regular notepad isn’t a good enough editor for me, so I use either notepad++ or VS Code. As long as it supports both JS and CSS, that’s good enough.
An Installation script is a must. The modding forum has a few topics for different scripts that can be used on different OSes, but I just wrote my own. Having a script makes it so much easier to copy the modified files over, and if you’re making a lot of changes, that saves a lot of time and prevents a lot of mistakes.
Writing the Mod
This is when the fun begins. Upon deciding I wanted to do something with the favicons, I use the browser inspector to see how they work.
What kind of mod?
There are two main mod types – a CSS mod and a JS mod (which might have a CSS component to it). CSS mods typically deal with changing how bits of Vivaldi look, and they are also easier to write and debug – you can do it right from the inspector.
Unfortunately, because I want to retain the original favicon in the tab bar, and that each tab has its own unique favicon element, a CSS mod won’t cut it. It’ll have to be a JavaScript mod – one that adds new functionality and interactions.
Observe the Mutations (JS)
The simpler of JS mods do things like take an element out of the browser and re-insert it somewhere else on startup. I’ve made an all-purpose mod to do this, but alas, I won’t be able to re-use this mod, as we need to dynamically copy and move elements as the browser changes.
One of the most useful tools for making more complex mods would be the MutationObserver. This lets you, well, observe for mutations. Changes to the browser – and that’s exactly what I need.
I’ve found that for pretty much any kind of mod, these observers are really useful in letting you react to the browser. There currently isn’t any way to “hook” into browser events in the same way you would a Web Extension or DOM events like “onclick“, so observers are the next best thing. You can use them to start defining your own events based on how the UI of the browser changes.

Identifying the parts of the browser that change with certain events, so that you can observe them, can be tricky. It would be very inefficient to just observe every single thing, so I need to look for a place where an observer will be triggered a minimal amount of times.
This gets easier the more you use and peek inside the browser. For my mod, the favicon I want to add somewhere else needs to match the active tab, so it would make sense to observe for changes to the tab strip.
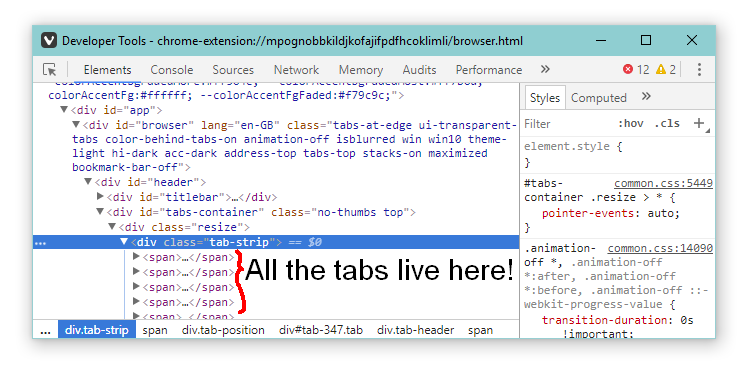
Debugging observers is quite a pain, though it can be made easier by using console.log() statements. Eventually, I dial down that I would want to observe the subtree (all the tabs inside the tab strip) and the attributes of tabs (the .active class is one such attribute).

Cloning the Favicon (JS)
Once I got a way to see when to trigger a new favicon, I next need to be able to make a copy of it. Now, copying a dom element isn’t very complicated – it’s literally just one method call cloneNode. What is a bit trickier is figuring out where to put the cloned element.
The browser inspector comes in very handy for things like this because it has built in drag and drop functionality – I can just drag the favicon from the tab to somewhere on the address bar and figure out what works best. Then, again using the browser inspector, get the selector of the element I’m placing it in and I can rely on my previously written method to move elements about.
Quickly testing changes like this can be done in the inspector without needing to restart the browser, as I can delete any cloned elements as needed, and just type the commands directly into the console. This is an early prototyping stage, so its fine to do this.
Styling the Favicon (CSS)
A slight issue with haphazardly moving things about is the browser isn’t always designed in an extendable fashion. Most of the toolbars handle this fine, through flex, but not the site security box. This requires some quick hacking of the styles to find a solution.
As I mentioned earlier, the inspector allows for easy CSS debugging in this manner, without needing to reload the browser after every change. If you want to try this, with an element in the inspector selected, click the + (new style) button in the style panel on the right. This will write new styles to a blank stylesheet. You can use the style editor in this panel, or click the stylesheet link to edit it by text, whichever you prefer.
It seems that all I need to do is make the site info box display: flex – nice and simple. The favicon needs a bit of coaxing though as spans don’t normally display if they don’t have text in them, so I need to force them to display: block and size it to a 16px square.

You have two options with a CSS mod like this – you can install it as a stylesheet on its own, or define it directly within the javascript. I chose to just define the rules programmatically in javascript:
- There are very few rules, so I can’t imagine much benefit in terms of readability or maintainability
- The rules don’t need to cascade, so I can apply them directly to the elements
- I can’t imagine these rules being used for anything else, so there’s no need to keep them in a separate mod
All together now
So, now that I can style the favicon appropriately, clone it when I need to, and have a way to artificially listen to certain browser events, I have everything I need. It just needs to go together. The mod is ready to use.
When it is all together in one JavaScript file, I can place it in my mod folder and run my mod installation script.
Test Test Test
Once I’ve written a version of the mod that does what I expect, the next step is to test. Lots of testing. In the case of my example, because it relies on the presence of the tab bar, changes to tabs, the address bar: I need to test each of these components.
An example: The mod needs to work if the active tab is changed – that I already know it can do. But what if the tabs are on the left side of the browser, does it work then? Upon testing, I find that it does, but you might need to restart the browser if you change this setting, which isn’t great, but I think I can live with it.
Fixing Bugs
There are more serious bugs though: what if the tabs or address bar disappears for some reason – if the user goes into full screen or turns on the Hide UI mode? This breaks the mod completely, because the Observers get disconnected and elements disappear.
Unfortunately, when I found this bug I needed a re-think of how the mod interacted with the browser. Now, I not only need to consider changes to tabs, but changes to the browser itself. It would be inefficient to just observe everything, so I need to find a way of dialling in as much as possible to specific changes to the UI.
When I write a mod, I do it in an iterative fashion, which means I often have to go back to the start and re-think how I write a mod, when I discover behaviour or a bug I didn’t initially expect. If I’m do things carefully, I can re-use a lot of the already written mod, and won’t have to change too much.
Much in the same way as earlier, I need to find a place to attach an observer to, this time in order to see if parts of the UI change or disappear.
By keeping the inspector open, and checking log statements while I show & hide parts of the UI, I can immediately see an entry point to attach an observer to: The classes (attributes) of the browser element. Vivaldi does a good job of describing the state of the UI with the browser classes, and by observing these I can re-attach any broken observers to ensure the mod always works. With this fix in place, I can now restart the testing phase.
As it turns out, fixing this bug also fixed a minor annoyance I mentioned earlier, and the mod will work if you change what side of the browser the tabs are on without needing to restart. Awesome!
Living with it
Even once I think I’m done with testing, I still take some time to just run with the mod in daily use of the browser before I release it to others. This is a good way of finding any small annoyances that it introduces, or obscure bugs that only crop up in rare situations.
Through this I have discovered some bugs, such as an issue with Vivaldi not updating favicons properly when I have my VPN extension enabled. There’s not very much I can do about this unfortunately.
Sometimes though, instead of revealing bugs to you, prolonged testing in this manner can reveal little behaviours that you never even considered. In this case, I discovered what happens when a page has no favicon. The browser copies the “no favicon” symbol, which Vivaldi represents as an SVG. And when this gets placed into the site security box, because of how Vivaldi’s CSS is written, this SVG automatically gets coloured to match the padlock. It’s great when things just work, props to the Vivaldi devs for that one.
Releasing the Mod
When I release a mod, I like to (and indeed would recommend) make a little write-up instead of just dumping the code. A description of the problem, a preview of a the solution (a screenshot or an animated .gif) alongside the code goes a long way to making the mod seem more professional.
I also release my mods onto a GitHub repository. This keeps just the code all in one place, and allows for someone to easily clone them all at once if they want to start tinkering.
There may come a time when a user will find a bug in the mod, or might request an additional feature. I always attempt to patch these.
Similarly, whenever Vivaldi jumps a major version, changes are introduced and you may need to update the mod. Luckily though the underlying structure of pages doesn’t change too much between versions, so I haven’t had to do too much of this.
I hope this walk-through of what I did to create a mod was interesting/helpful. Leave a comment if there’s anything you want to add, or any gaps you think could be explained a bit better.
You have noted very interesting details! ps nice site.
Great article, just what I was looking for.
Very clear procedure 🙂 well done
Thanks for this. Would like to see more of this.
Thank you so much 🙂
Howdy! Do you know if they make any plugins to
safeguard against hackers? I’m kinda paranoid about losing everything I’ve worked
hard on. Any tips?
The best way to use plugins to secure yourself against hackers is to not use plugins at all 😉
Mods are generally for advanced users and carry their own risks with them, so if you want to stay 100% safe the best is to go with a vanilla browser installation.
Extensions, though they have a safer API, can also be a security risk, so be wary of those too.